These are my final 3 pictures which I made for the assembly. They are all done in 3ds max. The Textures mostly were done by me, only textures for trees are downloaded from the internet and other sources. Before I started modelling I imagined that I was doing a small gallery pictures. "December", "July" and "The first of November" these are the months and topics I have chosen for my assembly. Even wonderful 3D models, lighting and textures will not help if the overall scene does not look good and interesting. When I design any picture I take under the consideration many things. Because I wanted to present my three pictures in the same way, so it was more difficult. I had to pay more attention to lighting, colours, and composition. the compositions is the most important element here. It connects all pictures together. July. July is a summer time. I didn't want to design simple beach with the sunshine. I was looking for something deep but also simple. The scene takes place on the lake. The most important are these two people on the boat. They are giving story to the scene. The environment with this light makes the picture more romantic.December. I wanted to do one picture which takes place inside building. I wanted this picture to have its own atmosphere. I did not pay attention to the story in this particular picture. Thanks for lighting the picture has Christmas atmosphere." The first of November". That was the last picture I have done for this module. From the other two that was the hardest one. I wanted to show this picture in a different way. I wanted this time something deep with strong metaphor. Every time people saying "what’s wrong with the colours?". Well this is how I imagine this day. I personally don't like it but if I had to do this again I wouldn't change anything here. I believe it looks how it should look. I don't really like describing my pictures. I prefer listening to others of what they think of them. I hope that you will find something interesting in my work.
Tuesday, 9 December 2008
Sunday, 23 November 2008
"The first of November"
"(...)the day when sadness and hope appear together.."
Here is my finall project


There was not much modeling, but I payed attention to textures and layers. Definitely this is the most complicated project from the other two. I had to organise my job precisely.

Here is my finall project


There was not much modeling, but I payed attention to textures and layers. Definitely this is the most complicated project from the other two. I had to organise my job precisely.
(to design the hair of the character above I used "hair and fur" modifier, the coat is the "plane" object with the "cloth" modifier)

At first I made the backgrounds. Thanks for that I could save time for the final rendering.
The last think to do, was to match the men with the scene. To save time of rendering I decided to set the scene as a background. Then I added the man. The plane is the object with the "matte/shadow" material which generates the shadow on the bitmap (background).
This is the finall result. I wanted this picture to look like a bit chaotic and disturbed. Thursday, 6 November 2008
Saturday, 1 November 2008
"July"
Here is my summer picture.
In the bottom there are some pics of models I have prepared for that project..


In the bottom there are some pics of models I have prepared for that project..


I didn't texture the ducks and the boat with people because I knew it was not necessary.
This is the final result. I've used only two "Omni" lights. To create grass I've used "Hair and Fur" modifier.
Thursday, 23 October 2008
My favourite months
July - mailny because of holiday. In July I always meet most of my family.
December - Christmas, christmas tree, presents, family meeting...this is what makes this month special,
the first of November (not favourite) - In my country 1st November is the day that we celebrate our relatives with died.
Tuesday, 21 October 2008
Tree tutorial
In this tutorial I will show you how to design a tree - easily and quickly. I recommend to use this method for static pictures only , don't try it on animation sequence.
First of all download/copy these two pictures (in the bottom):
(save the picture as trswomap.jpg) (save the other picture as trswoalp.jpg)
In the front view create an PLANE with dimension of 700cm weight * 500cm height (pic01)
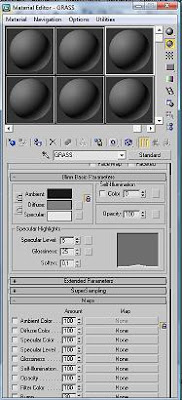
Then press "m" button on your keyboard, to open "material editor". (pic02)

(pic02)
Click "none" next to diffuse color in maps section. Chose bitmap. (pic03)
(pic03)
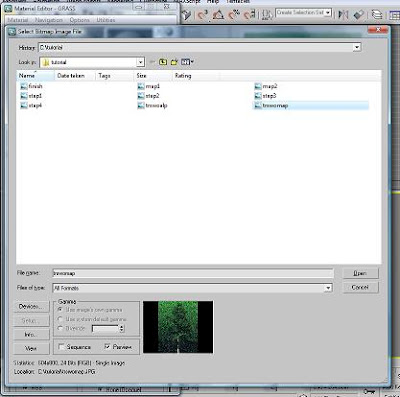
In the window that was created, find and select "trswomap.jpg" in the place where you saved it, and click "open" (pic04). Click "go to parent" to go back to the standard material (it looks like an arrow - just above the "bitmap" button)

(pic04)
Imput this material to the plane object (plane must be selected). To do this, use "assign material to selection".You are also expected to click "show standard map viewport". (pic05)
(pic05)
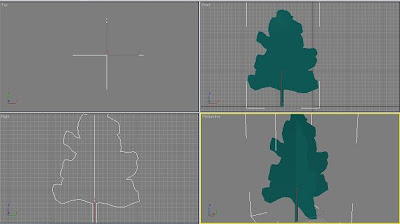
In the front view - window press F3. Use front view to draw Spline. As a model use plane with imput material. (pic06)
After finishing drawing spline, from modify list select extrude (also you can remove plane object if you want). When the Spline is still selected press right button on your mouse and convert object to EDITABLE MESH. Name the spline as "TREE-WHITE" (pic07)
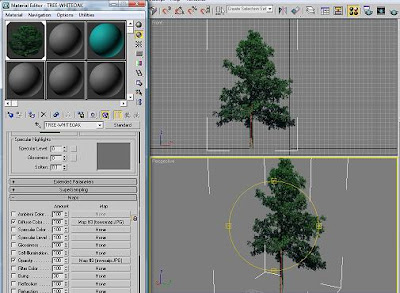
Press "m" to open "material map editor" (if it's not open yet). Using the same material as you did for the plane before, click "none" next to Opacity in maps section. Then bitmap. Find and open "trswoalp.jpg". Click "go to parent" (it's just above the bitmap button)And imput the new material to TREE-WHITE object (pic08)

(pic08)
Copy TREE-WHITE object and rotate it like in pic09. (Besides if you want you can attach both objects using Attach button, or you can make a group)(pic09)

(pic09)
Press "8" and change color of the background to white. Close "Environment and Effects" window. Go to perspective view, set up angle as you like and press F9 to see finall results.(pic10)
(pic10)
I really hope that this tutorial will be useful for you. Good luck and have fun!
Subscribe to:
Comments (Atom)


